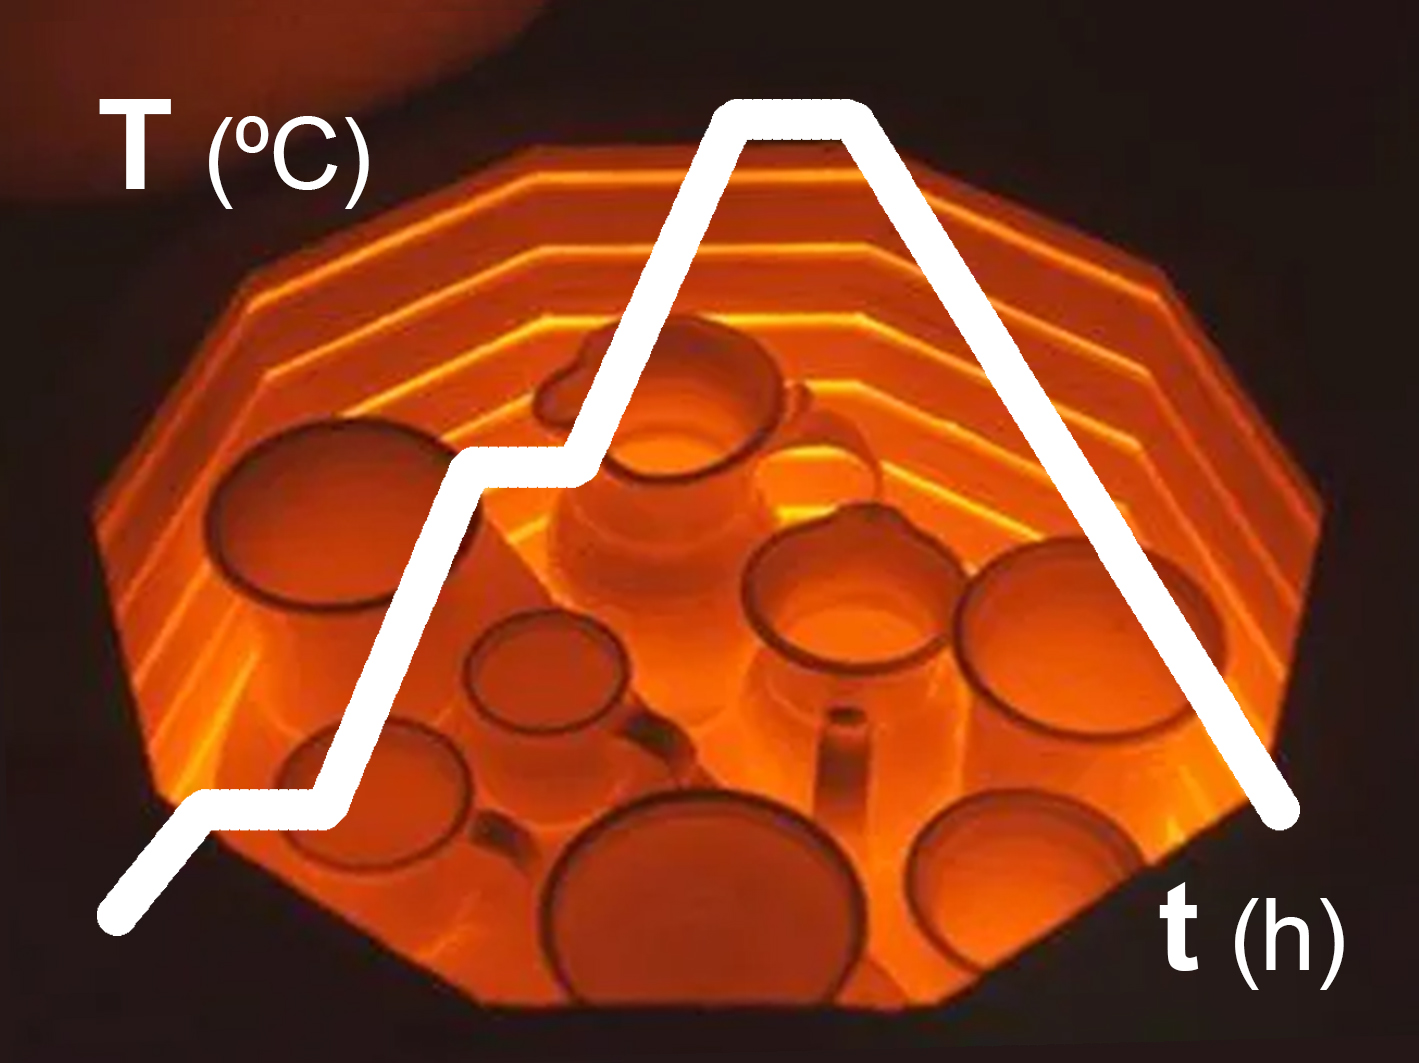
The firing curve of ceramic bodies is one of the topics that generates the most questions for our technical department. Beyond the final firing temperature (low, medium or high), the final result depends on the total heatwork received by the piece, which is determined by both the temperature reached and the time spent during the firing cycle. For this reason, an appropriate firing curve is essential to achieve the desired results while minimising the risk of cracks and firing defects.

Below, we explain the main stages of a conventional firing cycle and the most important recommendations for each of them.

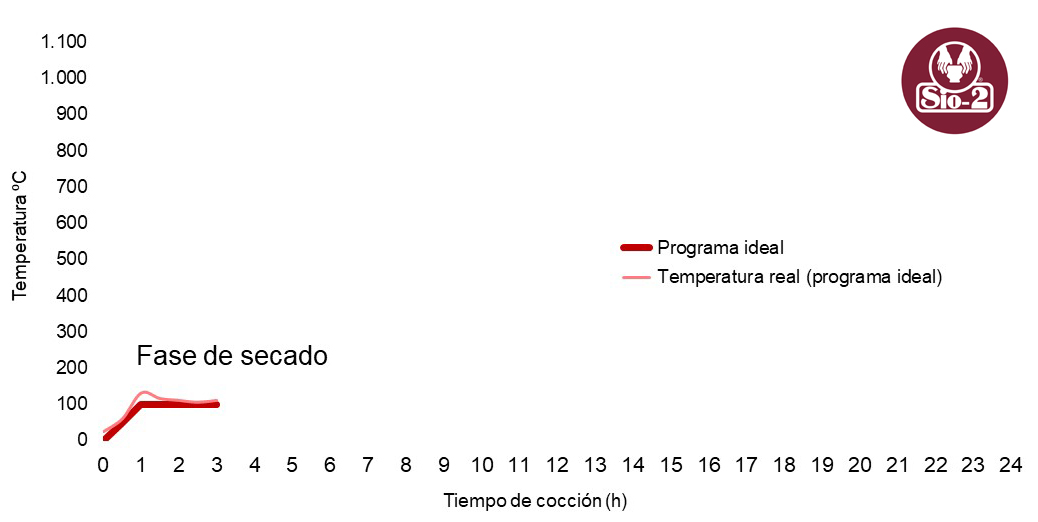
Drying Phase

Range: 25–100 °C

Even after drying naturally, ceramic pieces still retain a small amount of moisture in equilibrium with the workshop atmosphere. For this reason, it is recommended to begin the firing cycle with a drying phase to remove this residual moisture and prevent cracking during the subsequent heating stage.

The drying phase is carried out at approximately 100 °C, maintaining this temperature for long enough to completely evaporate any residual moisture from the pieces. The required time will depend on the type of clay body, the size and thickness of the pieces, and the drying conditions prior to firing. Since this is a relatively low temperature, extending the drying phase generally has only a minor impact on energy consumption compared with the benefits it provides. If the kiln is fitted with a vent or ventilation system, it should be left open to allow moisture to escape.

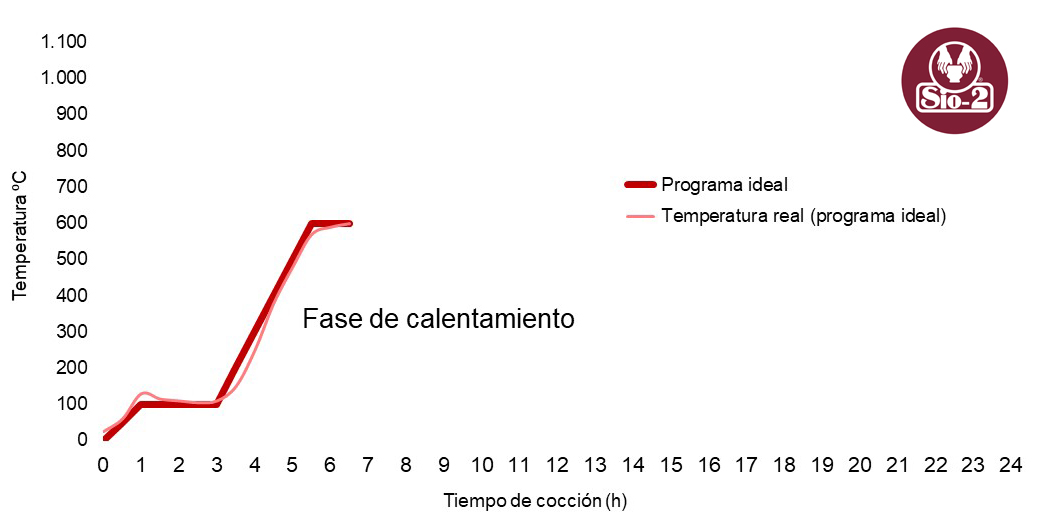
Heating Phase

Range: 100–600 °C

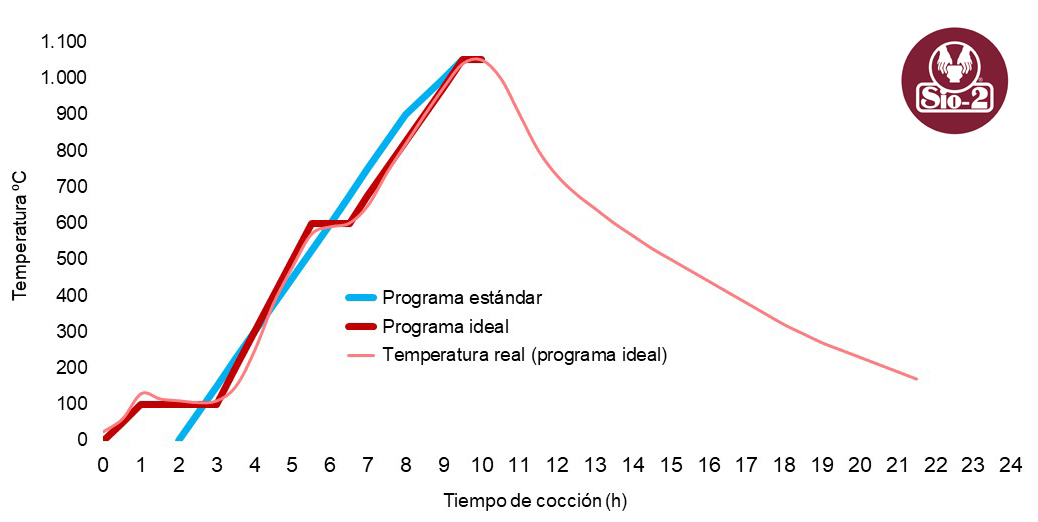
Once the drying phase is complete, the heating stage begins, raising the temperature to approximately 600 °C, typically at a rate of between 150 and 200 °C per hour.

Once this temperature has been reached, it is advisable to include a short soak to allow the quartz inversion and the release of chemically bound water from the clay minerals to occur more uniformly, thereby reducing internal stresses within the pieces. If the kiln controller does not allow a soak to be programmed at 600 °C, a similar effect can be achieved by reducing the heating rate within this range to approximately 100 °C per hour.

Throughout this stage, the kiln vent should be left open to allow moisture and gases to escape.

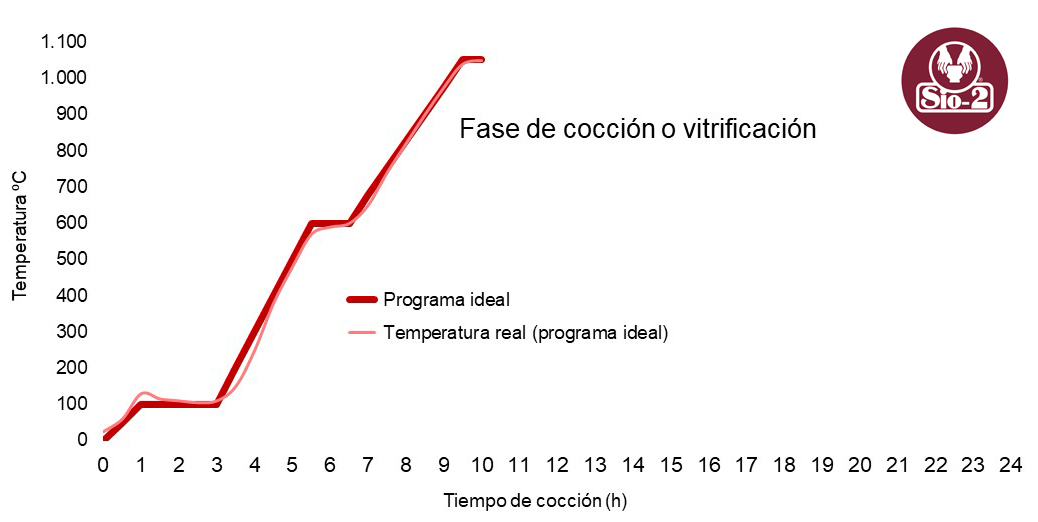
Maturing Phase

Range: 600 °C – Final Firing Temperature

Once the heating stage is complete, the kiln vent is closed and the actual firing begins. During this stage, most of the physical and chemical changes take place, transforming the clay body into a strong and durable ceramic material.

The heating rate during this stage is typically between 100 and 150 °C per hour. It is also advisable to reduce the heating rate slightly during the final stage of the firing cycle to promote a more even distribution of heat throughout the kiln load.

Once the final firing temperature has been reached, a 30-minute soak is recommended to ensure that all pieces mature evenly. For small firings or lightly loaded kilns, the soak time can often be reduced, whereas heavier kiln loads may require a slightly longer soak.

Cooling Phase

Range: Final Firing Temperature – 100 °C

Once the soak is complete, open the kiln vent and allow the kiln to cool naturally.

Important changes continue to take place within the ceramic material during cooling, particularly as it passes through the quartz inversion. For this reason, excessively rapid cooling should be avoided.

It is recommended not to open the kiln until the temperature has fallen below 100 °C, helping to prevent thermal shock and reducing the risk of glaze crazing.

Standard Firing Program

The diagram shows a recommended firing curve alongside a standard firing program from a kiln manufacturer, based on two heating segments and a final soak.

This standard program does not include the initial drying phase, which is strongly recommended, particularly when firing thick pieces or work that has not been allowed to dry thoroughly under natural conditions.

Many modern kilns include automatic firing programs with multiple heating segments that automatically adjust the heating rate during the final stage of the firing cycle, providing a more even distribution of heat throughout the kiln load and greater consistency from one firing to the next.

Temperature Control

Accurate control of both temperature and hold time during each stage of the firing cycle is essential for achieving consistent results. Modern kilns are equipped with electronic controllers and temperature sensors capable of following the programmed firing curve with great precision, ensuring uniform and repeatable firings.

Even so, the most reliable way to verify the actual outcome of a firing is still the use of pyrometric cones.

The heatwork received by the ceramic pieces depends not only on the temperature reached but also on the length of time that temperature is maintained, particularly during the final stage of the firing cycle. For this reason, two kilns reaching exactly the same final firing temperature may produce different results.

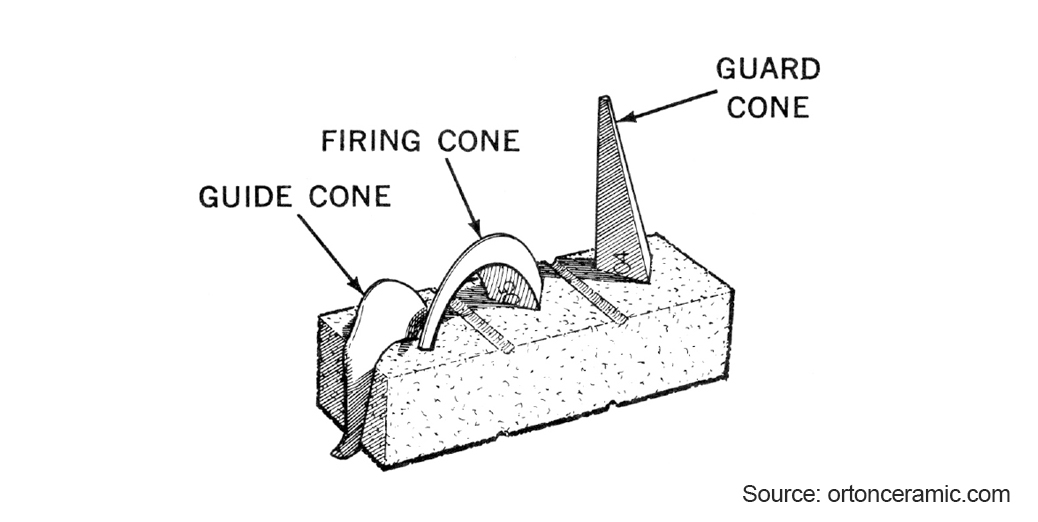
Pyrometric cones are designed to deform according to the amount of heatwork received. During firing they gradually soften and bend. Their final position provides a highly accurate visual indication of the actual heatwork achieved inside the kiln.

Three cones are typically used: the guide cone, which represents a slightly lower firing and should bend completely until it rests on the plaque; the firing cone, which represents the desired firing and should bend to approximately the position recommended by the manufacturer; and the guard cone, which represents a higher firing and should remain virtually undeformed.

If the cones do not bend as expected, it indicates that the heatwork received by the ware has been either insufficient or excessive, regardless of the temperature indicated by the kiln controller.

The firing temperature equivalents published by Orton for pyrometric cones are based on different heating rates. In studio ceramics, the firing programs used by most kiln, clay body and glaze manufacturers correspond to a final heating rate of approximately 60 °C per hour, which serves as the standard reference for interpreting these temperature equivalents.

Comments (20)

    • chatel
    • 2025-05-21 21:52:26
    Bonjour, est ce que ces paliers correspondent aussi pour la cuisson porcelaine ?
    • SIO-2
    • 2025-05-23 13:11:53
    Oui, la courbe de cuisson présentée dans le blog peut servir de référence pour la porcelaine. Nous vous recommandons de vous assurer que la température finale ainsi que le temps de maintien (palier) soient bien adaptés au type de porcelaine que vous utilisez.
    • ROSA
    • 2025-07-05 02:47:50
    Hola! Como debería ser la curva de segunda quema, para esmaltes de 1046 grados? Entiendo que la meseta final debe ser a 1046 por 10 a 15 minutos y luego enfriamiento. Pero no se cuantas hora debería demorarse en subir a 1046.. sería genial si me ayudan. Gracias!
    • SIO-2
    • 2025-07-21 09:25:45
    Para una segunda quema (cocción) con esmaltes que maduran a 1046 °C, efectivamente es importante mantener una meseta final de 10 a 15 minutos a esa temperatura, como bien indicas. Esto asegura una correcta maduración del esmalte. En cuanto al tiempo de subida en una cocción de esmaltado (bicocción), dependerá del tipo de horno y de la carga, entre otros factores. En líneas generales, podrías subir hasta 600ºC en unas 4h y en unas 3h hasta la temperatura deseada de 1046ºC. Llegados a este punto, mantén la temperatura unos 15 min y dejada enfriar el horno de forma natural, sin abrir hasta que no haya bajado de 100ºC.
    • Vinc.
    • 2025-08-11 13:39:01
    bonjour , pouvez-vous me détailler une courbe de cuisson idéal pour cuire de la porcelaine à 1300°
    • SIO-2
    • 2025-09-01 09:31:04
    De manière générale, la courbe que nous présentons dans le blog peut convenir jusqu’à 1300 °C. Le palier recommandé peut être de 20 à 30 minutes, selon l’épaisseur de la pièce à cuire.
    • Christine
    • 2025-11-07 23:28:04
    Bonjour , les recommandations du fournisseur de ma terre qui est GSA ( grès de Saint Amand) préconise de cuire à 50 degré par heure entre 450 et 600 degrés. Si je fais votre courbe , qu'est ce que ça risque ? Merci
    • SIO-2
    • 2025-11-11 15:16:00
    La recommandation du fabricant de votre terre d’augmenter la température de 50°C par heure entre 450°C et 600°C vise à faciliter l’élimination des matières organiques, la transformation allotropique du quartz ainsi que l’évaporation de l’eau structurale des minéraux argileux (principalement la kaolinite dans les pâtes de grès). Ce ralentissement entre 450°C et 600°C correspondrait au palier proposé dans notre courbe à 600°C. Si vos pièces sont de grande taille, nous vous recommandons de suivre les indications du fabricant, qui sont plus conservatrices que la courbe que nous proposons (plus simple et adaptée à des conditions standard).
    • Jose
    • 2025-11-10 00:43:13
    Para hornear filtros ecológicos donde el carbón activado no debe desaparecer. Que temperatura recomiendas? He visto videos que dicen a 750 grados pero las piezas a esa temperatura están todavía como crudas. No muy resistentes como tiestos y el agua las desintegra.
    • SIO-2
    • 2025-11-11 15:24:34
    El carbón comienza a descomponerse y a quemarse a partir de los 500-600°C. Por ello, no se recomienda someterlo al proceso de cocción cerámica, ya que en este se alcanzan, como mínimo, temperaturas de 800-900°C. La mejor opción es cocer primero la arcilla por separado y añadir posteriormente el carbón activado, evitando así su exposición a altas temperaturas que podrían destruirlo. De este modo, se conservan tanto la resistencia de la pieza como la funcionalidad del carbón.
    • Andrea
    • 2025-11-20 09:34:56
    Buen día, me podrán enviar un programa para cocción de gres. Gracias.
    • SIO-2
    • 2025-11-24 15:36:43
    Para el programa de cocción de un gres, te recomendamos seguir la curva estándar descrita en este blog, ya que ofrece una base sólida para la mayoría de piezas cerámicas. En cuanto a la temperatura máxima, es importante ajustarla a las indicaciones del fabricante. En en el caso de una pasta de gres, lo habitual es trabajar alrededor de 1240 °C, salvo que se especifique lo contrario. Ten en cuenta, además, que si vas a cocer piezas muy voluminosas o con geometrías complejas, o si tu horno está muy cargado, es aconsejable prolongar los tiempos en cada etapa para asegurar una maduración uniforme y evitar tensiones internas. Un calentamiento y enfriamiento más pausados son recomendables en situaciones más complejas.
    • Paula
    • 2025-11-29 20:05:25
    Hola , porque una pieza totalmente plana ya con una primera quema bizcocho , la esmalto la vuelvo a poner al horno a segunda quema y me salen curvadas ?
    • SIO-2
    • 2025-12-01 15:13:42
    Las piezas planas bizcochadas pueden deformarse durante la cocción del esmalte (segunda cocción) cuando el coeficiente de dilatación del esmalte es mayor que el de la pasta. En estos casos, especialmente con esmaltes de fuerte agarre, el esmalte se contrae más durante el enfriamiento y ejerce tensión sobre la pieza, provocando arqueos o curvaturas. Para minimizar este efecto, es útil aplicar el esmalte en capas más finas y uniformes, evitar esmaltes con coeficiente muy superior al del soporte y, si es posible, equilibrar tensiones esmaltando también la cara posterior. Cocer las piezas sobre placas refractarias planas, reducir la velocidad de enfriamiento y evitar soportes excesivamente delgados también ayuda a mantener la planitud.
    • Noe
    • 2025-12-11 21:38:39
    Hola! Tengo un horno de muestras de 3litros y realizó piezas muy pequeñas, me conviene hacer esta misma curva respetando la cantidad de horas o puedo acelerar el proceso? Si es así que recomendaciones podrías darme. Gracias!
    • SIO-2
    • 2025-12-15 15:10:12
    Si trabajas con un horno de muestras y realizas piezas muy pequeñas, no es necesario respetar la misma cantidad de horas de cocción que para piezas grandes. El calor llega más rápido al centro, por lo que puedes acelerar un poco la curva, siempre cuidando que la subida de temperatura sea constante y que no se superen los límites de temperatura recomendados. Incluso en piezas pequeñas, un enfriamiento gradual ayuda a evitar grietas y tensiones internas, logrando resultados uniformes y seguros en menos tiempo.
    • A. María
    • 2025-12-14 20:00:10
    Hola, ¿Cómo puedo controlar la curva de temperatura de la cocción, en un horno de gas de dos quemadores? Nada más encenderlo marca una subida de temperatura rápida y al cerrar la puerta del horno, a la hora marca una subida de 400ºC. Por otro lado, es real dicha temperatura? (ya que el pirómetro se encuentra cera del quemador). Gracias y un saludo.
    • SIO-2
    • 2025-12-16 11:56:52
    En los hornos de gas es habitual que la temperatura suba muy rápido al inicio de la cocción, especialmente al encender los quemadores y al cerrar la puerta del horno. Esto se debe a que los quemadores trabajan a alta potencia y el horno aún no tiene masa térmica caliente que estabilice la subida. Además, cuando el pirómetro está ubicado cerca del quemador, suele indicar temperaturas más altas que las reales, ya que mide el calor directo de la llama y no la temperatura media del interior del horno ni de las piezas. Por este motivo, las temperaturas indicadas no siempre representan la cocción real. Para un mejor control, es recomendable regular el gas de forma progresiva, controlar la entrada de aire y verificar la temperatura con conos pirométricos o sensores colocados en zonas más neutras del horno. Aunque la curva de cocción en hornos de gas nunca es tan precisa como en los eléctricos, con una medición adecuada y una regulación cuidadosa se puede conseguir una cocción estable y repetible.
    • Marta
    • 2026-03-05 11:18:50
    Hola, no me queda claro el tiempo de cocción. ¿Son 22h? Gracias
    • SIO-2
    • 2026-03-05 16:22:08
    Las 22 horas que aparecen en la gráfica corresponden al ciclo completo del horno “de frío a frío”, es decir, desde que empieza a calentarse hasta que vuelve a una temperatura segura para abrirlo. Sin embargo, la parte que realmente controla el programador es solo el calentamiento hasta la temperatura máxima, que en el ejemplo dura unas 10 horas e incluye las distintas rampas y el palier de cocción. A partir de ahí comienza el enfriamiento natural del horno, que no suele programarse y puede variar según el horno, la carga o la temperatura ambiente. En cualquier caso, tal como se explica en el texto, no es recomendable forzar el enfriamiento: lo ideal es dejar que el horno baje la temperatura lentamente y esperar a abrir la puerta cuando esté por debajo de unos 100 °C.

New comment

You are replying to a comment

Product added to wishlist
group_work Cookie consent